
Note: This nifty little DIY project comes to us courtesy of our friend Nut.
This is a little project that originated with one too many trips to Disney with Nanci, who likes wearing her R2-D2 Mouse Ears and eat cannibalistically out of an R2-D2 popcorn bucket. After a couple evening trips to the park, the question arises: “Wouldn’t it be cool if it had lights and made noise?”
Well of course it would! But Disney hasn’t taken us up on our suggestion (yet), so here’s how to make your own.
You will need the following:
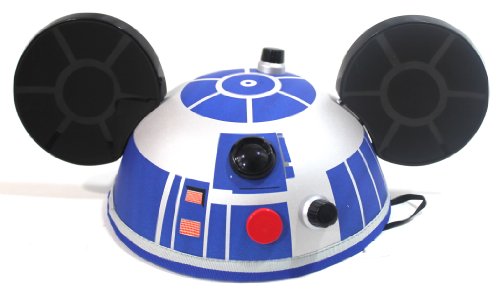
-R2-D2 Mouse Ears from Disney
-2012 Star Wars Saga Movie Legends R2-D2 Or Barnes and Nobles Star Wars: Build R2-D2 Kit
(The talking R2-D2 figures can be difficult to find but the Barnes and Nobles Star Wars: Build R2-D2 Kit is readily available. It also easier to use.)
If using the 2012 Star Wars Saga Movie Legends R2-D2 (or similar) you will need:
- -Large pliers
- -Flat head screw driver
- -Small flat head screw driver
- -Small Philips head screw driver
- -X-acto Knife
- -Paper towel, cloth towel, or leather scrap
- -Glue (optional)
- -Power drill with a 9/64 bit or slightly larger
- -Electrical tape
- -Needle
- -Thread
- -Scissors
- -Felt
- -Protected work surface
- -Appropriate PPE (glasses or gloves may be needed)
If using the Barnes and Nobles’ Star Wars: Build R2-D2 Kit you will need:
- -Power drill with a 9/64 bit or slightly larger
- -X-acto Knife
- -Flat head screw driver or pry bar
- -Electrical tape
- -Needle
- -Thread
- -Scissors
- -Felt
- -Protected work surface
- -Appropriate PPE (glasses or gloves may be needed)
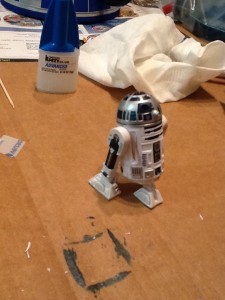
If you use the 2012 Star Wars Saga Movie Legends R2-D2, you will have to kill Artoo. There’s no way around it. If you’re using Barnes and Nobles’ Star Wars: Build R2-D2 Kit, you get to skip the joy of destruction and zip straight to the construction steps.
Deconstruction (2012 Star Wars Saga Movie Legends R2-D2 or similar only):
(Warning: Extreme Violence against R2 Units)
Watch this video for the appropriate way to dissect an R2-D2 action figure:
Did you watch it? Good, now watch it again.
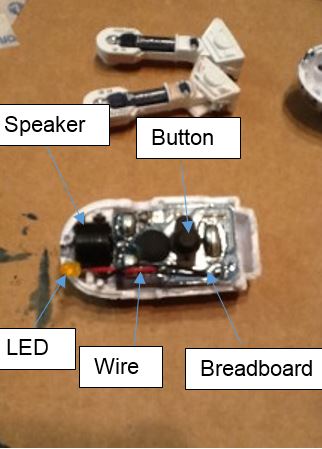
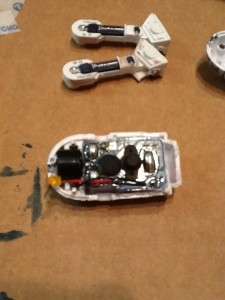
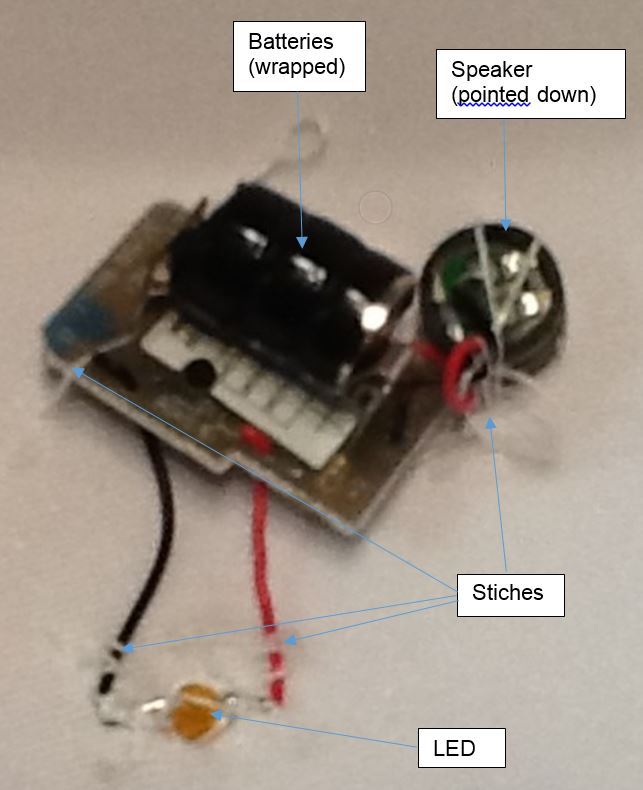
Your goal is take out the small breadboard, LED, speaker, and batteries without harming them. Do not break the wires or bend the microchip. When you get the batteries out, stack them on top of each other (positive to negative) and wrap the sides with a piece of electrical tape to keep them together in one convenient battery pack.
Artoo Autopsy:
If you’re careful, you’ll have a gutless R2-D2 to glue back together that will still look nice. Watch the video a couple of times before attempting. Some of the steps require a bit of strength or a lot of leverage. Be very careful to keep your fingers, eyeballs, and body out of the way when crushing, prying, and cutting. Don’t do this on an unprotected surface (if you’re using the dining room table, lay down some plastic and cardboard).
A cold and soulless machine:
Construction (both methods):
Step 1: Drill a hole in the hat.
Each of the hard plastic decorations on the hat is both glued on and held on by a peg that has been punched through the hat with a tab on the back to trap it in place. Find the one holding down the red fake light. Break off the tab in two pieces by prying up with a flat head screw driver (or use a pry bar that was actually made for stuff like this). Then remove the part of the sharp plastic remaining with an X-acto knife. Be very careful to keep your fingers, eyeballs, and body out of the way when prying and cutting. Don’t do this on an unprotected surface (if you’re using the dining room table, lay down some plastic and cardboard).
Firmly press a Phillips head screw driver to the center of the peg to provide a starting point to center the tip of the drill. Drill the hole very slowly, from the backside out, with lots of stops to make sure you are centered and not drilling through your work surface. Try not to catch the cloth of the hat. Then run the drill through the hole a few times to get rid of the spare plastic bits. The resulting hole should be just big enough to fit an LED.
If you are using the Barnes and Nobles’ Star Wars: Build R2-D2 Kit, you can create a second hole for the other LED or just leave the second LED hidden under the hat. Remember to measure the wire distance to make sure both LEDs will fit. Do not try to drill through the hat anywhere other than the hard plastic pegs. An X-acto knife can be used to cut through the foam and material of the hat, but be warned, it might fray.
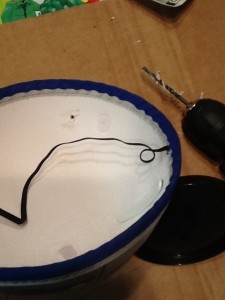
There’s a hole in my hat:
 Step 2:
Place the electronics in the hat. The LED should fit in the hole. Bend its pins out so they are flush with the hat (without breaking the solder joints!).
For the 2012 Star Wars Saga Movie Legends R2-D2, try to get speaker, the breadboard and batteries higher up in the hat where there is more room between the hat and your skull. Do your best to keep the mass centered. It will be harder to keep on your head if the mass isn’t along the center line. Right behind Artoo’s black ‘eye’ works well
After you have them placed, use some simple stiches to hold them in place. There is a shiny material over the foam of the hat that snags fairly easy with a needle, which is good for grabbing a few basting stiches. The goal is to affix them to the hat without placing stress on the solder joints. You’ll want the breadboard to be able to move a little up and down so the button actually works.
Stich on either side of the LED solder joints to keep the joint from breaking. Looser stiches hold both the speaker and the card. The switch is up against the hat and the batteries are on top for easy replacement (wrapped in electrical tape).
Open head surgery:
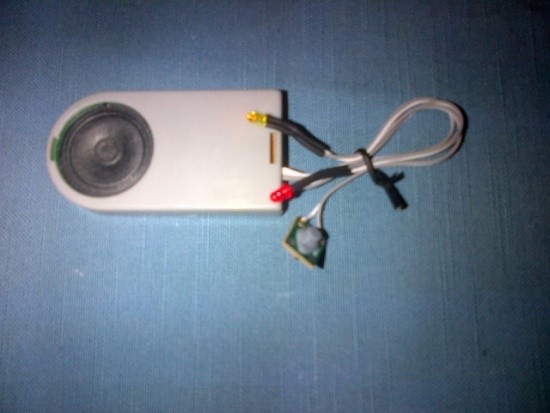
For the Barnes and Nobles’ Star Wars: Build R2-D2 Kit, you have a little more room to play. The grey plastic case contains the speaker, breadboard, and battery. It can fit easily in the center top part of the hat. Make sure the speaker is pointed into the hat and not into your head so others can hear it. The small grey pressure switch should be affixed firmly behind one of the plastic pieces, like Artoo’s black ‘eye’, so that you can trigger it easily by squashing it between the plastic and your head. After you have them placed, use some simple stiches to hold them in place. There is a shiny material over the foam of the hat that snags fairly easy with a needle, which is good for grabbing a few basting stiches. The goal is to affix them to the hat without placing stress on the solder joints. Stich on either side of the LED solder joints to keep the joints from breaking. You may want to tape the grey plastic case to the hat in addition to stitching it since it is heavier and may pull through the stiches. You’ll also want to secure the long wires with a few stiches to keep them out of your hair and against the hat.
The Barnes and Nobles’ Star Wars: Build R2-D2 Kit speaker, LEDs, and button:
Step 3:
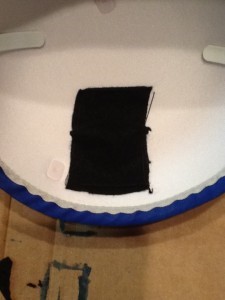
Comfort. For both methods, cut a piece of felt of an appropriate size to cover the electronics components inside the hat. On the reverse side of the felt (the side that will be against the electronics), cover the felt with a few strips of electrical tape. This is a simple precaution to insulate the exposed wires, batteries, and breadboard from your sweaty skin and hair. Stich the piece of felt over the electronics so they won’t poke you in the head. You may need access to the batteries or to reposition the button so don’t make it too permanent.
Extra sweat band:
Please avoid exposing the electronics to water. The plastic foam nature of the hat will protect it from incidental water spray but you may want to think twice about wearing it on the Kali River Rapids or a mid-afternoon downpour.
Note that the hat is now a little more top heavy. You’ll have to use the chin strap (or hair pins) to secure it on rides or on windy days.
