
Last time in our Tosche Station Brewhouse post series, we talked about crafting the Sinjir’s Rath IPA. This time around, we’re going to be brewing this sucker!
As a reminder, I use Picobrew’s rather innovative Pico Model C countertop homebrew system. This device is an internet-connected smart appliance that’s not much bigger than your average toaster oven, so it’ll be right at home in your kitchen. So often when people think about homebrewing, the thought of garage filling burners, containers, and meticulous monitoring requirements. Picobrew miniaturizes, simplifies, and automates the whole process to the point where a homebrew idiot and amateur like me is able to brew my own delicious beer. Before diving into the brewing process for the Sinjir’s Rath IPA, let’s talk about what actually comes in the box when you buy a Picobrew Model C. To the jump!
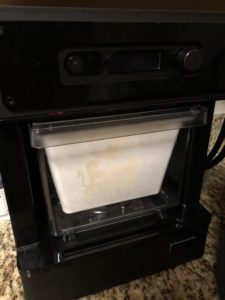
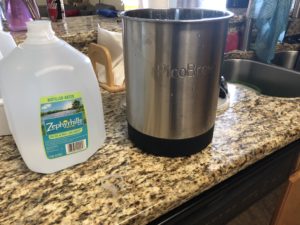
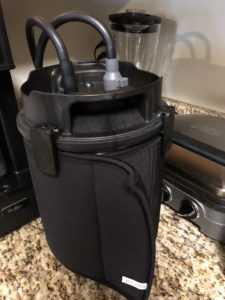
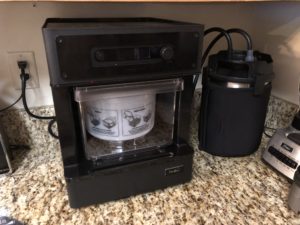 The first thing, obviously, is the main Picobrew unit itself. This thing fits perfectly on my kitchen counter and just looks like it belongs with any other appliance I might have. This is going to be the control center for your brewing process. On first startup, you’ll connect it to your home’s wifi, which will allow it to pull firmware updates and keep you posted on your brew process by logging into your account on Picobrew’s webpage. Inside of the unit you’ll also see a clear step filter, which will house your hops and grians packs during the brew process. The next thing you’ll get is the Pico C fermentation keg. This will plug into the main unit and store the wort (pre-fermented beer) created by the Picobrew and will be the vessel where fermentation happens. The connection is made via two hoses connected to the main device. You’ll also receive a bucket with accessories you’ll need for the brew and cleanup process, such the hops cradle which will hold the hops pack during the brewing process, a fermentation seal, and a racking tube you’ll use to transfer your beer from the fermentation keg to a serving keg.
So! You’ve set up your Picobrew and have it connected to the Internet. What now? Well, you’ll need to get yourself a PicoPak from Picobrew. As mentioned in the last post, you can create your own recipe with the Freestyle crafter. You can also head to the marketplace to buy PicoPaks designed by craft breweries and other Pico users. As a note, if you purchase two PicoPaks at the same time, Pico drops the cost of shipping from your order. For the purposes of this post, the PicoPak we have is the Sinjir’s Rath IPA we designed in the last installment. For more information on designing PikoPaks, you can also listen to the first episode of the Tosche Station Brewhouse podcast where Kristen and I put together a Hondo-themed lager.
When you order a PicoPak, you’ll get a couple things in your shipment…
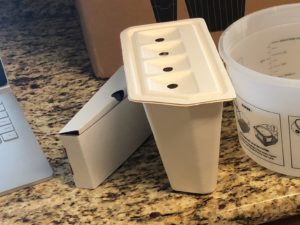
First up is the hops container in the center of the above image. This contains your primary bittering, flavoring, and aroma hops. The Picobrew unit will pour hot water during the brewing process over each stage of the pack to impart taste and scent to your beer. You’ll also notice in this image is a small cardboard box. This will contain two or three items. All of them will contain a yeast package, which you’ll use during the fermentation process. They’ll also contain carbonation sugar which you’ll use in the racking process. Some beers, such as this one, will also include some additional sachets of hops that are utilized for a phase called Dry Hopping. We’ll come back to that later, but for now, set the yeast, carbonation sugar, and dry hops in your fridge until needed.
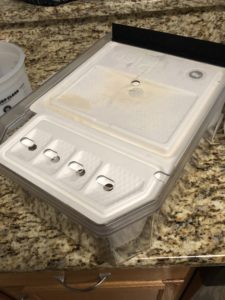
The other thing that comes in your PicoPak shipment is the grains pack. You can see that above, and as you can tell, it fits into that clear step filter that was sitting inside of the main Pico unit. After you slot the grains in, you’ll place the hops pack directly in front of it, place the step filter lid over both packs, and then insert the step filter back into the Pico. The next thing to do in brewing this Sinjir beer is taking the fermentation keg and filling it to the fill line with distilled water.
Why distilled water? Because the kind of water you use in brewing is important. Tap water varies wildly from city to city, state to state. Distilled water is a nice sort of control that ensures you’re not cramming minerals into your beer that you don’t really want. In addition to filling the fermentation keg with distilled water, you’ll also want to fill the reservoir at the top of the main Picobrew unit with distilled water as described in the manual. Once you’ve done that, you’ll want to lock down the lid and attach the fermentation keg cozy around the keg. This will help the wort maintain the correct hot temperature as the wort is being created.
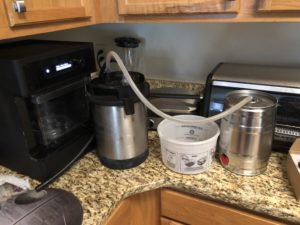
From here you’ll use the hoses from the Picobrew to connect the keg to the main unit, power it on, and then select the option to brew your beer. The Picobrew will walk you through several steps on the LCD screen to make sure everything is ready to go, and when you’re all set, you’ll tell the unit to go to work. Congratulations! Over the next two hours you’ll get the enjoy the delicious smell of Sinjir’s Rath IPA brewing in your kitchen. While this is going on, you can log onto your Picobrew account on their website to monitor the process. You’ll get to see exactly where in the brew session it is, and the temperature everything is working at, as well as get a rough ETA on when the mash process will be finished.
After that two hours or so is up, you’ll disconnect the brew/fermentation keg from the main unit, take the cozy off, place the fermentation seal on the lid, and then set it aside overnight to cool down to room temperature. After that, take care to follow the instructions in the user manual to empty out the Picobrew’s reservoir and ensure everything is cleaned correctly. You’ll also need to dispose of the hops and grains pack before cleaning out the step filter. It should be noted, these packs are completely compostable!
After letting the keg sit at room temperature overnight, you’re going to need two things: a whisk and the yeast you have stored in your fridge. Open up the lid on the keg and set that down on a sanitary surface. Next, you’re going to use that whisk to stir the wort in the keg for about three minutes to aerate the liquid. This is a critical step in the fermentation process, as that aeration will help the yest do its work. Once you’re done with that, carefully cut open the yeast pack and sprinkle it into the keg. Place the lid back on, lock the fermentation seal again, set it aside in a climate controlled space, and then it’s time to hurry up and wait. The strength of your beer is going to determine how long it needs to sit and ferment. The Sinjir’s Rath IPA has an ABV of 8.2%, which means that if your keg is sitting in a room that stays somewhere from 75-84 degrees fahrenheit, it will need to ferment for approximately 6-8 days.
Now, remember that packet of dry hops? If you have one for the beer you’re brewing, that’s going to come into play three days into your fermentation process. Pull the dry hops from your fridge and then unseal and lift up the lid on the keg slightly, dropping it in. That’s pretty much it for dry hopping, just let the wort continue to ferment for the remaining days. After the 8 days (or whatever length your custom beer requires) is up, the keg goes in your fridge to cold crash for two or three days, which drops the yeast and other particulates to the bottom of the keg.
After the fermentation time and cold crash are up, it’s time to rack your beer, which simply means moving it into a serving keg. You’ll remove the fermentation seal, and then connect the brew/fermentation keg back up to the Picobrew. In this step, you’re also going to need the racking hose and your serving keg. Once that’s all hooked up, you’ll use the Picobrew’s Rack Beer option to perform the transfer.
We’re getting to the last step here! After the beer is transferred, you need to carbonate it (because no one likes a flat beer). There’s two options for this process. The first is using the carbonation sugar that came with your PicoPak. In general, Picobrew suggests you pour that in, seal the serving keg, and let that sit for twice as long as the beer took to ferment. In other words for this beer, sixteen days. Now I’m impatient, but good news there. You can get something called a forced carbonation unit to speed the process up.
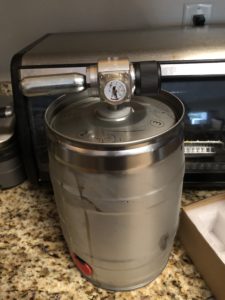
Yup, that is pretty much just a regulator with a paintball CO2 cartridge attached to it. This gets the carbonation process down from 16 days to about 36 hours. All you have to do here is attach the cartridge to the regulator, attach the regulator to the serving keg, and then set the pressure to about 24 PSI. Return to your fridge, and then let it sit for that length of time. Thirty-six hours later, though, it’s time to finally enjoy the fruits of our labor! Remove the regulator and cartridge (making sure to dispose of it properly), then put a serving plug in at the top of the keg. There’s just one thing left to do.
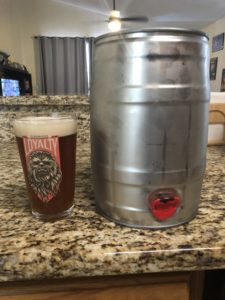
That’s right, it’s time to finally enjoy your beer.
The Sinjir’s Rath IPA definitely came out as a heavy, strong pale ale as expected. It’s got a similar weight and consistency to a Cigar City Jai Lai, one of my favorite local beers. The taste is definitely bitter, and the color a dark copper (much like Sinjir). All in all, a successful first custom brew for myself. I do think I’ll be revisting this one, and I might revise and bump up the bitterness factor a touch and see if I can reduce the heaviness a bit, but overall this is one I’d be more than happy to share with friends.
From start to finish, brewing on this took about thirteen days. In general, the stronger the beer, the longer the process. If you’re brewing a lower ABV beer, you could be done with the process in as little as 7-8 days. That’s with a complete amateur like me at the helm! Overall I can’t be happier about how this went. The brewing process from conception to beer-in-glass is a complete delight, letting me take some pride and turning something I love into a hobby I have control over. If you’re a beer fan like myself, I can’t recommend enough giving this a go yourself.
Stay tuned for more brewing fun on the Tosche Station Brewhouse podcast, where we’ll be diving deeper into brewing fun and creating even more recipes for our favorite Star Wars characters!
